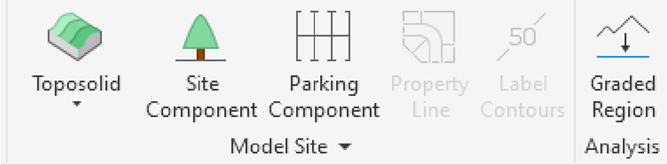
Now it’s official – Autodesk has retired the “old” Toposurface and replaced it with a new category: the Toposolid. In this post, we will go through everything you need to know about the new Toposolid and cover all of the Environment tools that, as always, support and enhance the new Revit functionality.
So, what exactly is a Toposolid?
If you know Revit well enough, imagine that a Floor and a Toposurface fell in love and had a baby – this would be the Toposolid! We are basically talking about a solid element that includes Types and parameters that allow you to add structural layers – very similar to a Floor, but with additional Topography capabilities, such as contour lines and contour labels.

Here are 10 things you need to know about the new Toposolid:
01. What happens to old Toposurfaces when you upgrade a Revit file?
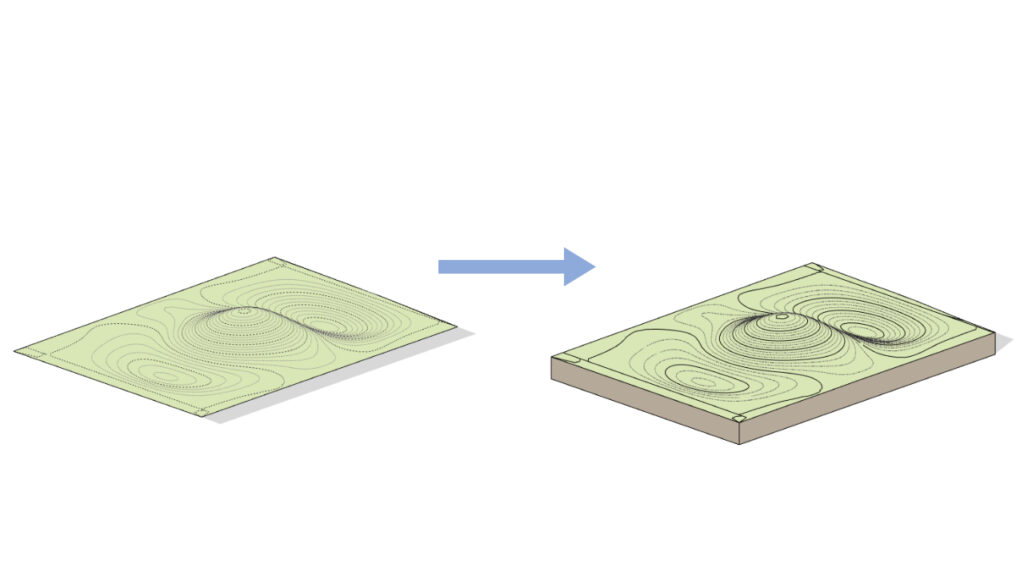
If you upgrade a Revit file to Revit 2024, any legacy topographies (Toposurface) will remain unchanged but will no longer be editable. To edit them, you’ll need to convert them into a Toposolid by selecting the Toposurface and using the ‘Generate Toposolid’ command on the Modify ribbon.
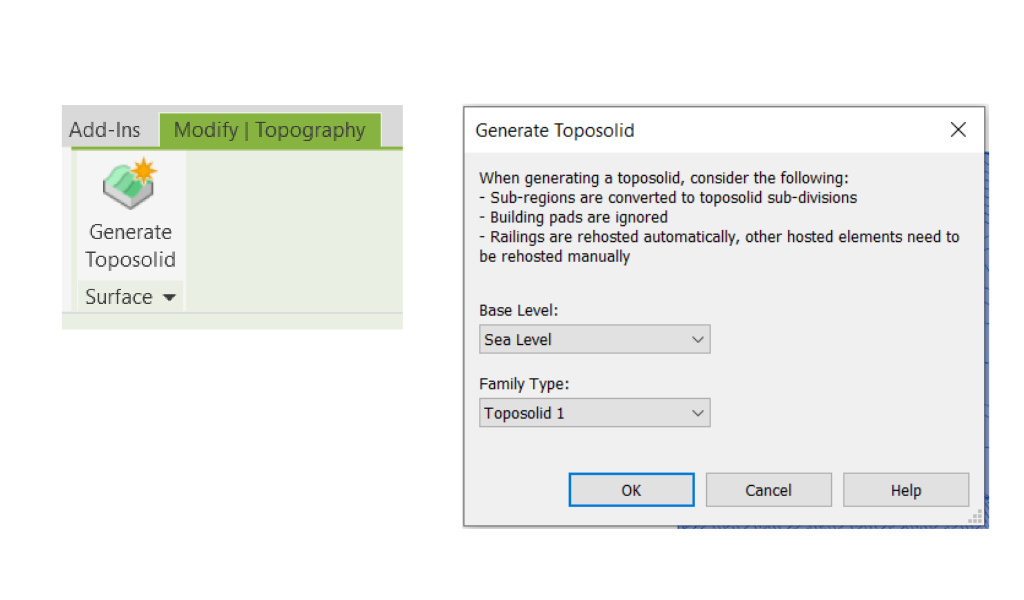
Keep in mind that generating a Toposolid will cause any Building Pads to be deleted, as there are no Building Pads in Revit 2024. It’s also worth noting that the old Toposurface will remain in place after the conversion. It’s recommended to keep the old surface in the project to make sure the conversion results are accurate.
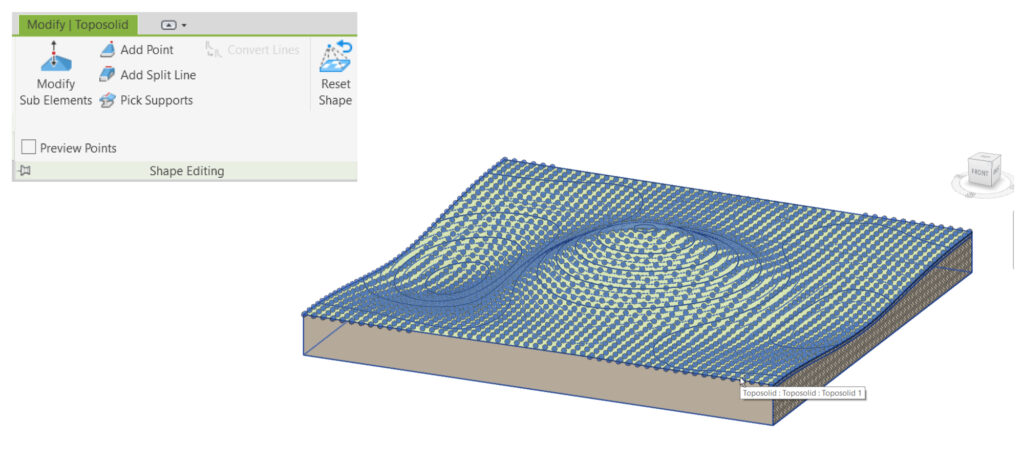
02. How to create a new Toposolid?
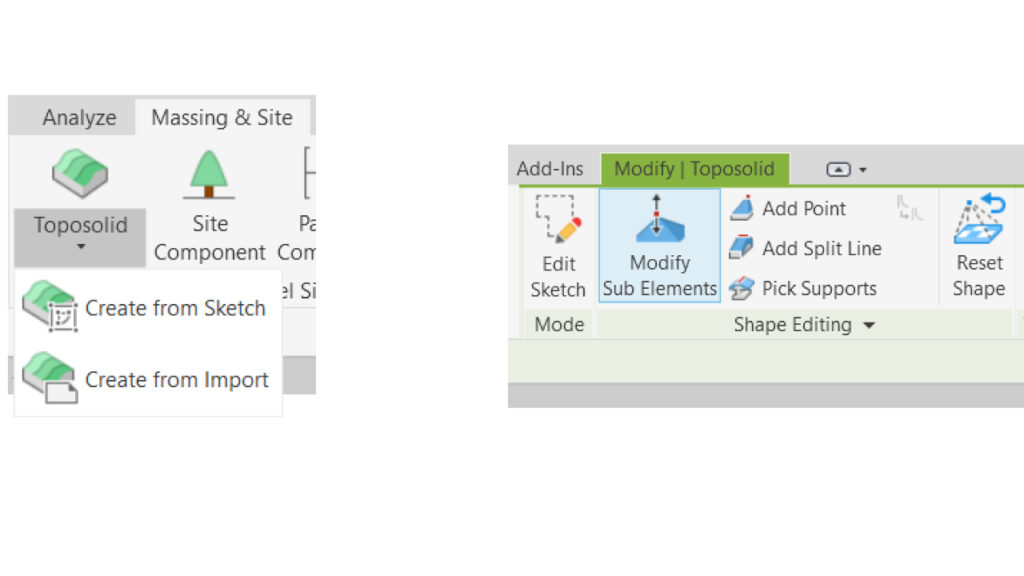
To create a Toposolid, you can sketch a boundary similar to the way you would create a Floor. Once the boundary is complete, you can add elevation points by selecting the Toposolid and using the ‘Shape Editing’ commands in the ‘Modify Toposolid’ ribbon.
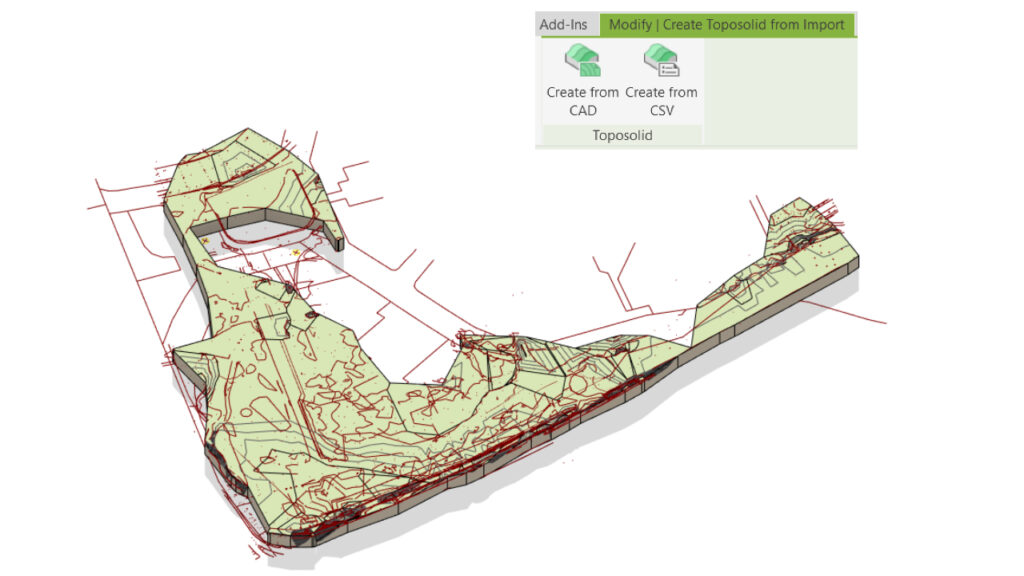
It’s worth noting that you can create a Toposolid from a CAD or CSV file, just as with Toposurface before. A useful improvement in Revit 2024 is that surfaces created from CAD files can now have a concave boundary, which eliminates the need for additional splitting as was required in the previous version.
03. Everything is relative, especially elevation points
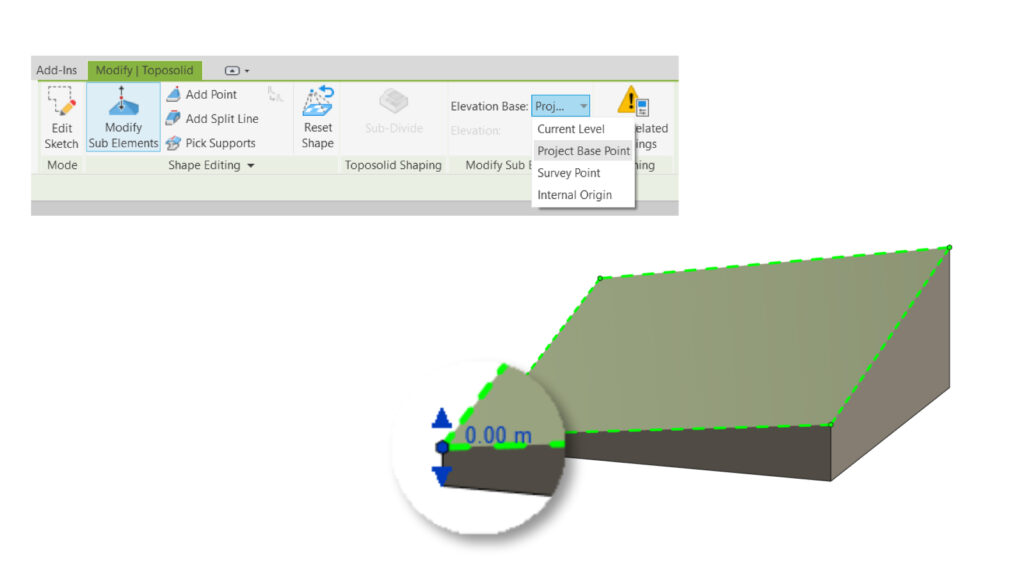
In Revit, Toposurfaces, elevation points can only relate to the Internal Origin point, whereas the new Toposolid allows points to relate to a connected level, a Survey Point, the Project Base point, or the Internal Origin. When creating a Toposolid from a CAD file, the elevation will be absolute and relate to the Internal Origin point. Keep in mind that a Toposolid behaves like a Floor with a Variable Material, meaning that it can’t have a negative elevation below its base. To achieve an elevation below the base, the Toposolid must have a thickness greater than that negative elevation height. For example, to create a point at elevation -5m on a Toposolid situated at elevation 0.00, the surface Type would need to have a thickness of at least 5.1, i.e., something greater than 5.
04. No more site settings- contour settings in the Type
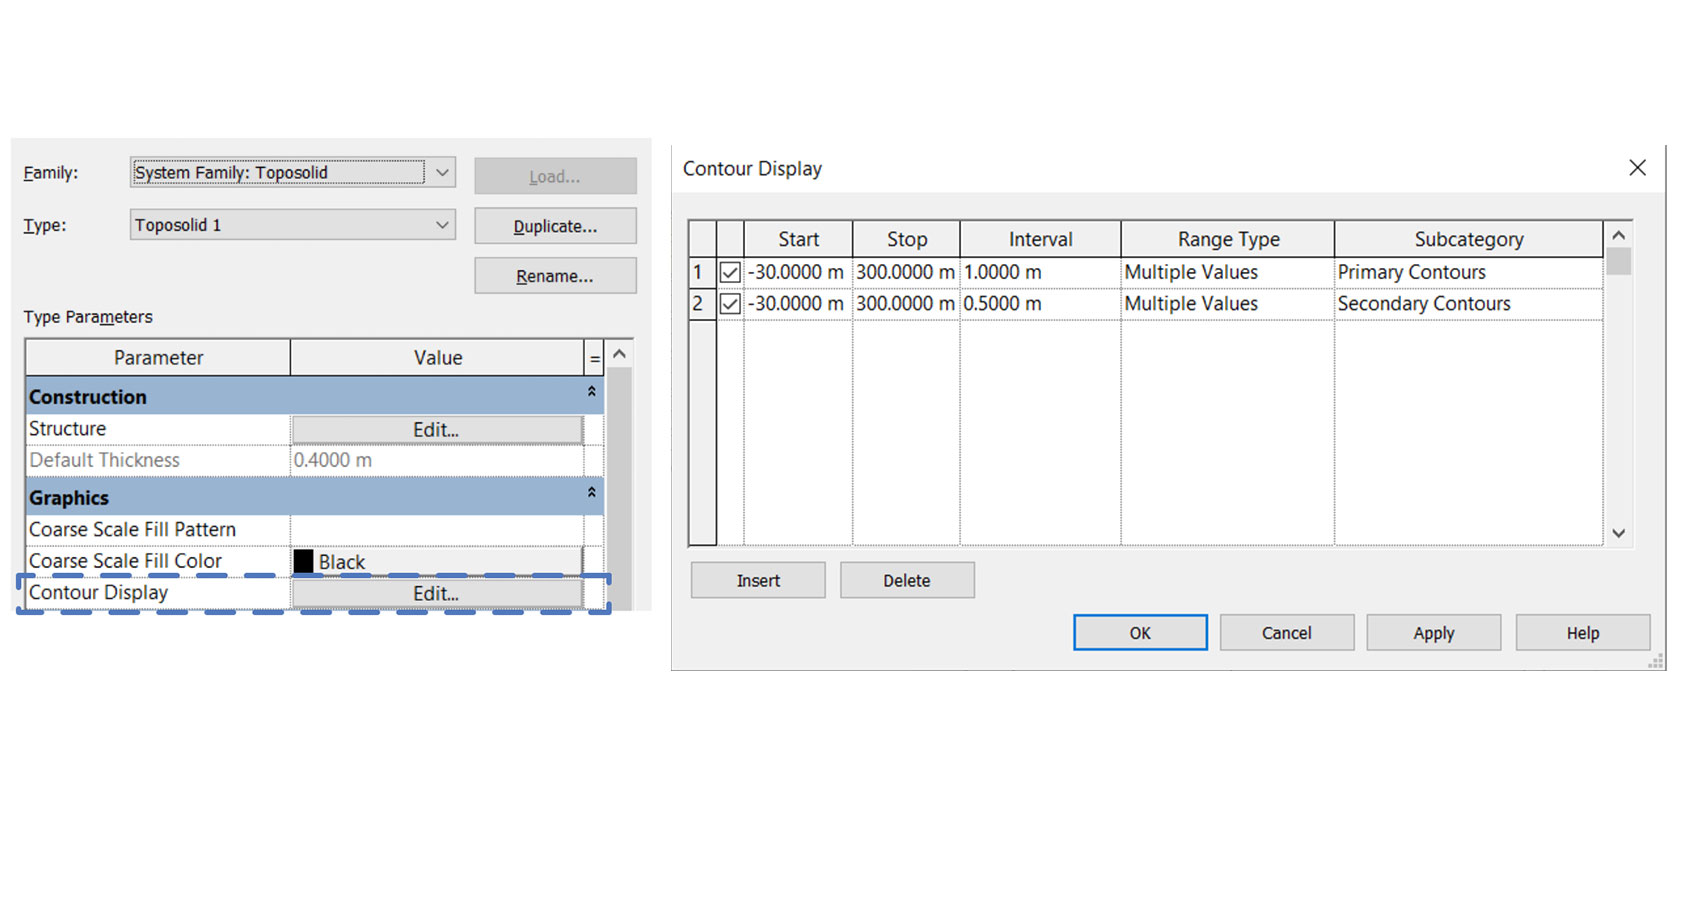
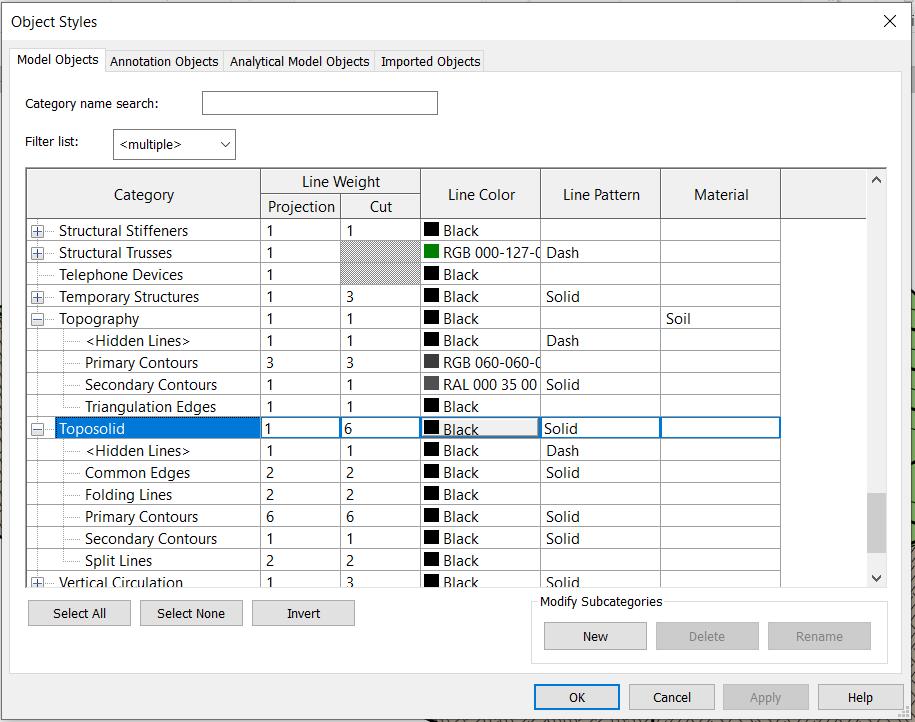
The site settings menu in Revit was previously difficult to find, located under a small arrow on the Massing and Site ribbon. However, with the new Type-based Toposolid, defining the visibility and increments of contour lines for all the topographies in the file is much easier. Simply access the line styles and increment settings under the Type properties. Use the “Object Style” menu to change the color and patterns of contour lines throughout the project or use the “Visibility Graphic Overrides” menu for specific views. However, keep in mind that contour lines cannot be seen in edit mode, so this may pose a challenge for site design projects.
05. So many new cutting categories (YEY!)
Another major modeling improvement is the ability to cut into a Toposolid using the “Cut Geometry” option on the “Modify” ribbon, and the best part is that there are many new categories to use. This means that modeling is now much more flexible. The categories that can cut include Toposolids, Ceilings, Floors, Slab Edges, Roofs, Facia, Gutters, Roof Soffits, Structural Foundations, Walls, Wall Sweeps, and Mass Void From. So, if you’re looking to model a tunnel or a roof garden, this new feature will come in handy.
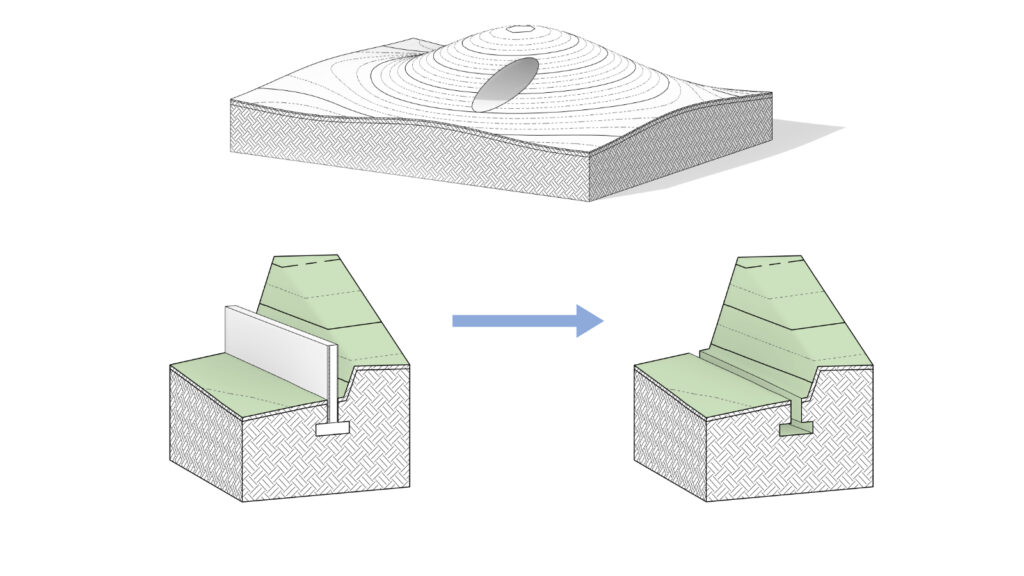
06. No more Building Pads for better or for worse
The Toposurface is not the only element we are saying goodbye to. The Building Pad element is also being retired, which is probably bad news for many who loved it. However, you can still achieve similar results using a simple mass to cut into the solid, although with less flexibility. Unfortunately, there is still no solution for building areas that are above the existing surface and needs to be filled. On the bright side, the new Void Form now offers the ability to create sloped edges that cut down into the ground. (Remember Mass is not available for Revit LT).
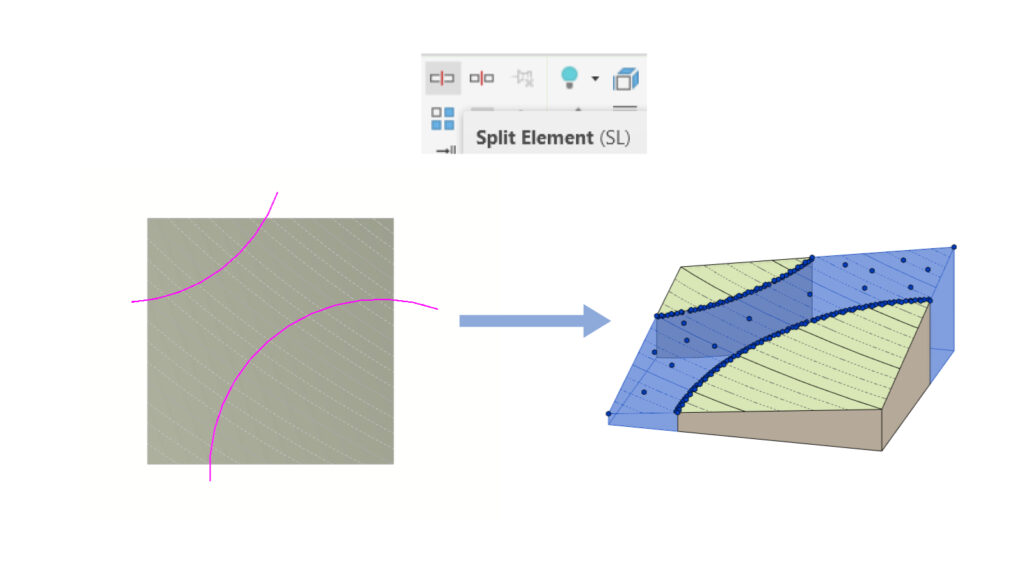
07. No more ‘Split Surface’ – The familiar ‘Split’ tool works on Toposolid (OMG)
One of the best features of the new Toposolid in Revit is that you can now freely cut and split it using the “Split” tool on the “Modify” tab – this is definitely one of our favorite things about the update! However, keep in mind that once you split a Toposolid there is no Merge option like there was with Toposurfaces.
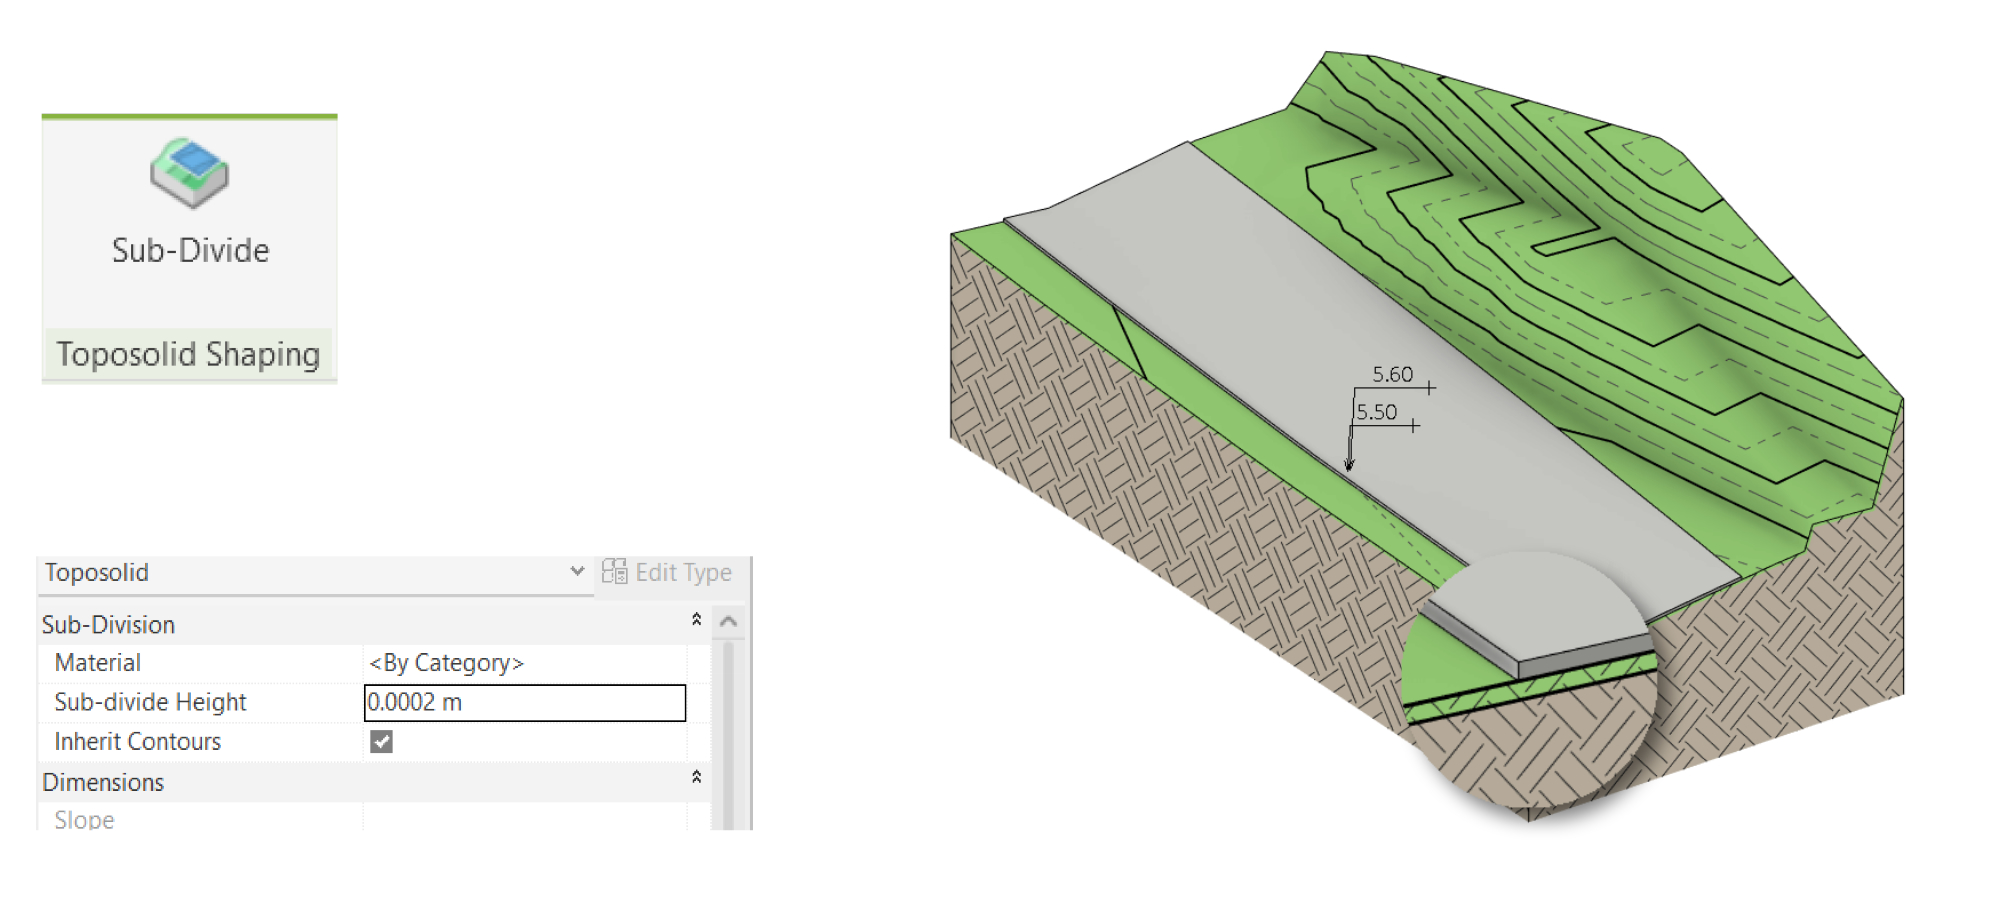
08. Sub-Division instead of Sub-Region
As the Toposurface is being retired from Revit, so to is the Sub-Region element. However, we now have the Subdivision command as a replacement. A Sub-division is like another Toposolid that is draped over the existing one, but unlike the Sub-Region, it can’t be placed at the same elevation as the original surface. It needs to have a minimum thickness of at least 1/128 inches (0.2mm), so it cannot have a negative value assigned to it. I must admit, as landscape architects, we find that this feature can be a handy bonus when working on small-scale residential projects, however, it is a bit pointless for larger models.
09. Turn off points when not in edit mode for better performance
This is a nice one if you work with complex surfaces which is common in site design projects.
By default, Toposolid points won’t be visible when you hover over them, unlike the way Floors work. However, if you need to see the Toposolid’s points all the time, you can easily turn on this option by clicking the small arrow on the ‘Shape Editing’ panel.
10. The native Cut/Fill feature uses a different calculation method.
First of all, it’s important to note that you shouldn’t rely on native Revit cut and fill values for separate Toposolid elements.
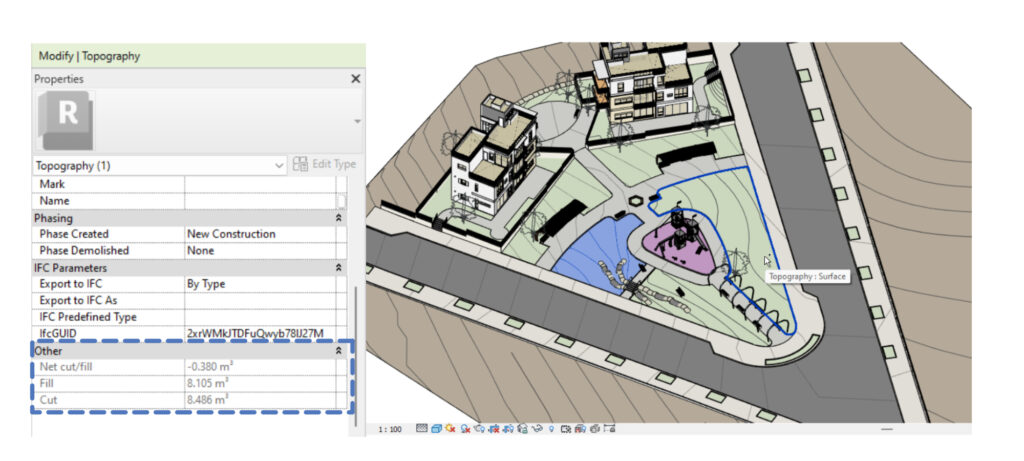
In previous versions of Revit, when you created a new Toposurface, the system provided accurate grading information for each design element, regardless of its shape and material (see the example in the picture below).
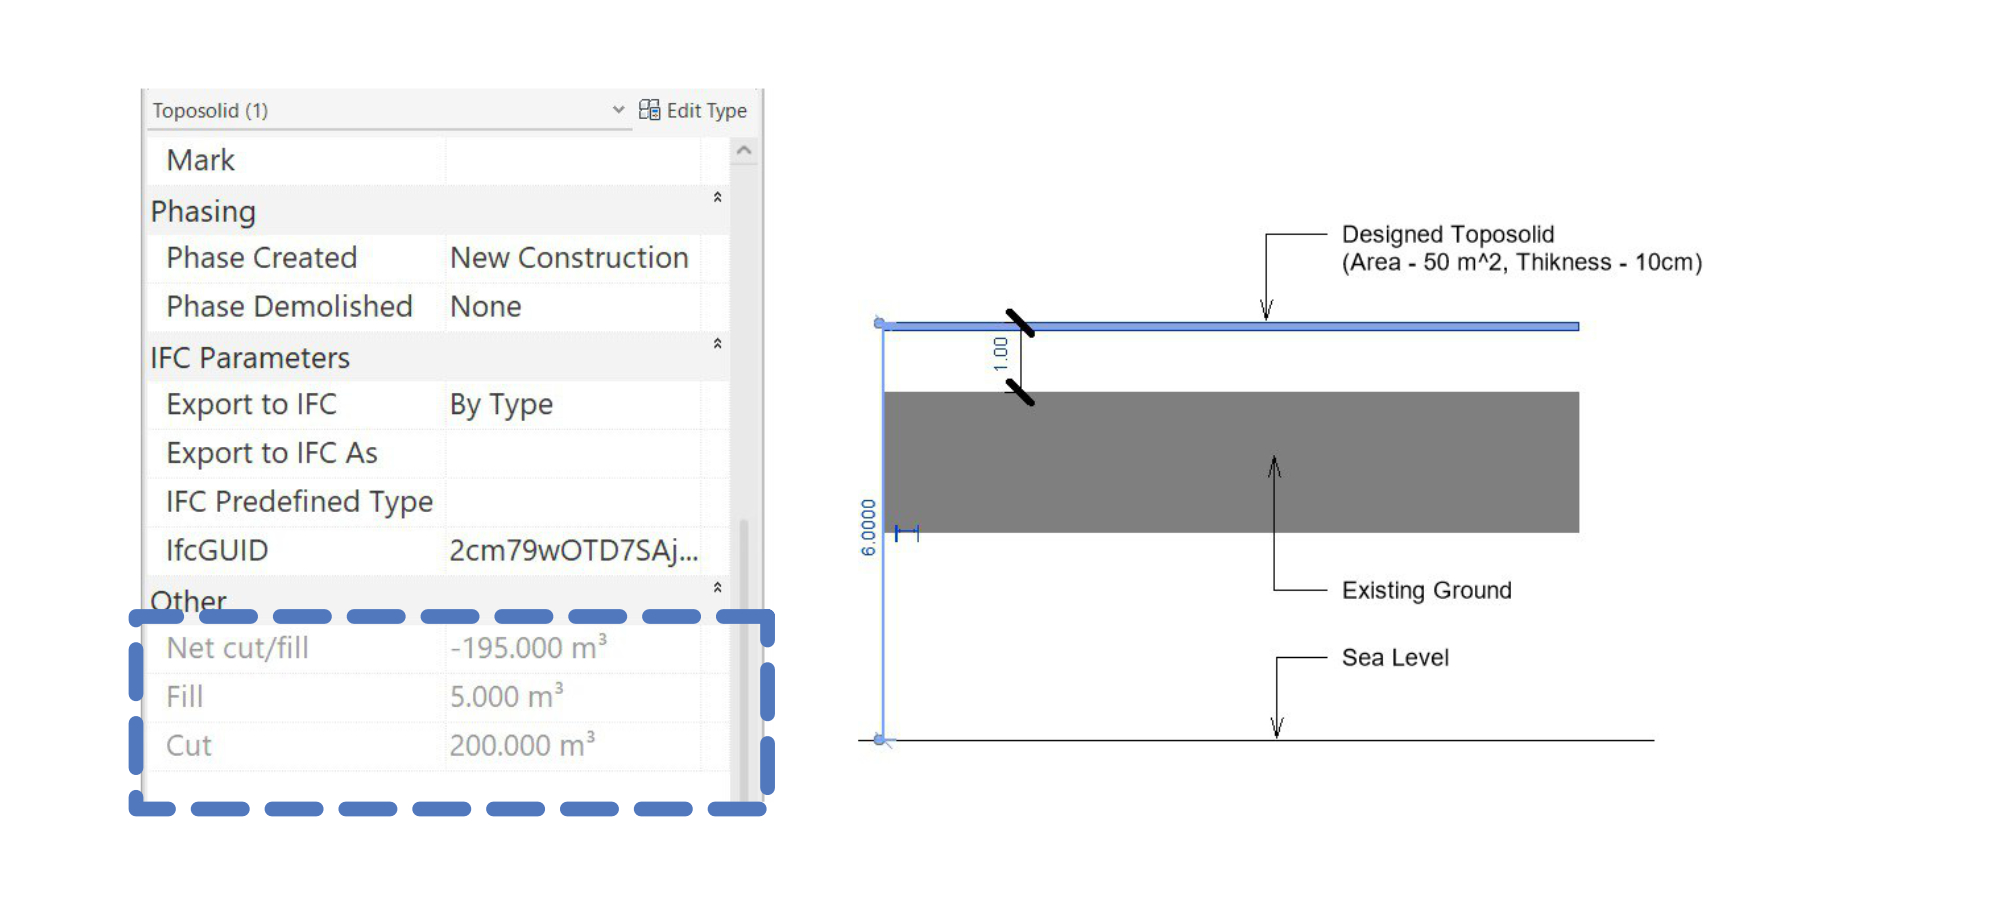
However, with the new Toposolid, this behavior has changed, which may lead to significant discrepancies when compared to the site’s actual grading during construction.
Instead of calculating the volume difference between the top faces of the existing and proposed surfaces, the feature now uses a Boolean operation to calculate the actual difference between the two solids (since now the existing ground is also solid, with its own thickness depending on the Type of Toposolid used). While the Boolean operation method allows us to calculate the cut volume in cases such as an underground structure, which wasn’t possible before, this method is not suitable for site grading.
In Revit 2024, earthwork calculations will only work as expected if you use the proper and somewhat tedious graded region workflow, using a Toposolid Type with a Variable Material in the Type structure. Any changes made to the proposed Toposolid’s boundary or Type throughout the project will result in the wrong calculation.
To wrap up on a positive note, you still can achieve proper grading calculations using third-party applications such as Environment for Revit® J.
That brings us to the next part of this post… While we are all overjoyed that the Toposolid is finally here, and while it’s a great step forward for site design, it’s still missing some functionality. As always, that’s why we’re here.
9 additions to Environment tools to fit the new Toposolid
Now that you know all about the Toposolid, how it works, and what its limitations are, it’s time to review the associated changes and additions we’ve made to Environment for Revit®’s Topography Tools.
Environment has long been recognized for its state-of-the-art topography tools, that enable users to perform grading tasks quickly and accurately. With the release of Revit 2024 and its transition from mesh to solid elements for topographies, we’ve updated our Topography Tools to ensure seamless integration with the new Toposolid category.
With the new version of Environment, you’ll still get all the functionality you’ve come to love, plus even more options and cool features. The new interface will allow you to effortlessly transition to Toposolids, making it easier for you to leverage the new category in your designs.
So, without further delay, here are 9 things you should try out in the new Environment 11.0 with Revit 2024:
(Note: Environment 11 supports Revit 2020 and up, but some of its features are specific to Revit 2024)
1. You can now select the elevation base (Revit 2020 and up)
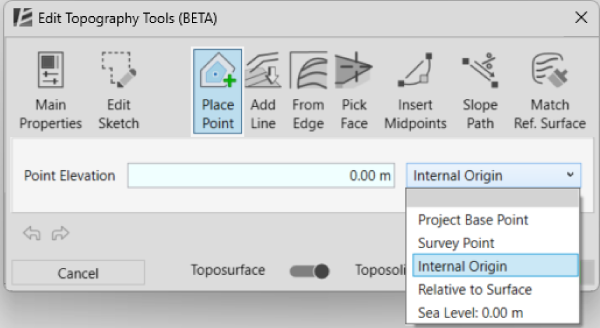
Up till now, when editing a Toposurface, the elevation of each point on the surface always referenced Revit’s Internal Origin. In V11.0, we’ve added to the Topo Tools the option to select the elevation base, allowing you to choose a Survey Point, or the Project’s Base Point as the reference point for you elevation points, instead of the Internal Origin. And the best part? Changing the elevation base won’t affect the position of the point on the surface.
2. Everything you already know, stays the same
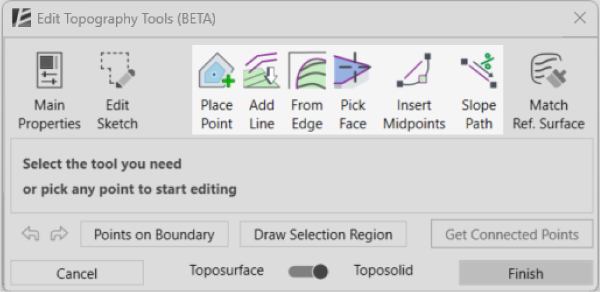
All the familiar tools are still here, allowing you to easily edit surfaces and place points in smarter and faster ways, such as adding a single point, placing points along Model Lines or model edges, interpolating between two existing points, creating a line or a curve of points based on a defined slope, or mimicking an existing model face by picking it and placing points on it.
3. We’ve kept the good old black points:
Since the new Toposolid operates similarly to Floors, its editing points resemble, as you might have guessed, those of Floors. However, we have chosen to maintain the Toposurface style of editing points – small and black – for more convenient editing of complex surfaces. Therefore, whenever you create or edit a surface using Environment’s Topography Tools, you will see the familiar black points.
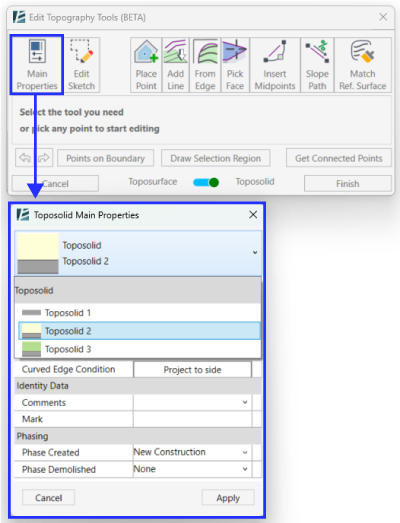
4. Type selection through the Topography Tools dialog:
When creating or editing a Toposolid using Environment tools, we have added the option to select a Type from a drop-down list in the Topography Tools dialog. Why? Because the Toposolid is a Type-based element. The list includes all Toposolid Types present in your project. However, due to API limitations, it is currently not possible to create new Types within the Topo Tools dialog. We hope to be able to provide this feature in the future. You will also be able to define certain instance properties from this dialog, as well.
5. Toposolid boundary sketch:
To fully support the Toposolid, we have added the ability to edit an element’s boundary directly from the Topography Tools dialog. This offers greater flexibility in your workflow, eliminating the need to exit Environment to make boundary edits. With this new feature, you can easily switch between point editing tools and boundary editing tools within the Topography Tools dialog.

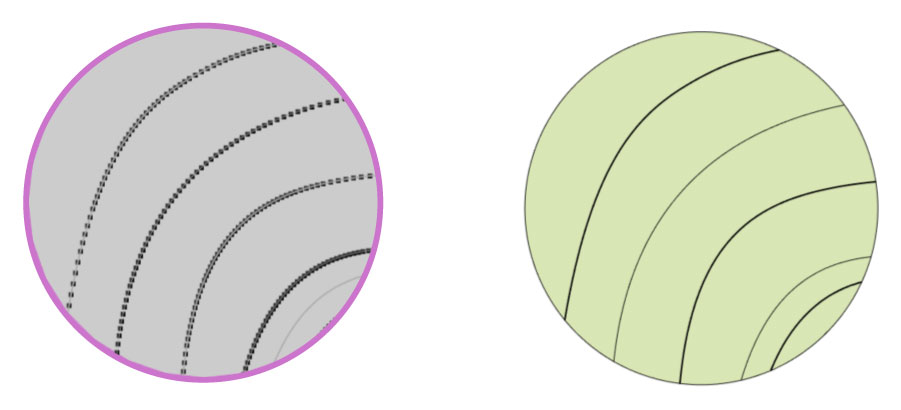
6. Visible contour lines while editing a surface:
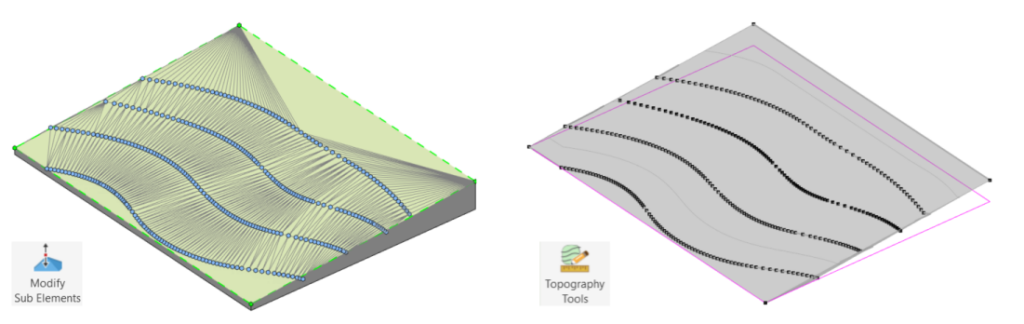
Being able to see contour lines and changes in these lines as we edit points on a surface is invaluable for site design. Unfortunately, in the new Revit, it is currently not possible to view contour lines on a Toposolid while editing it. To address this limitation, we have ensured that when you use Environment’s Topography Tools to edit topographies, you can view contour lines as you make changes to the surface. This enhancement greatly improves site design precision and accuracy.
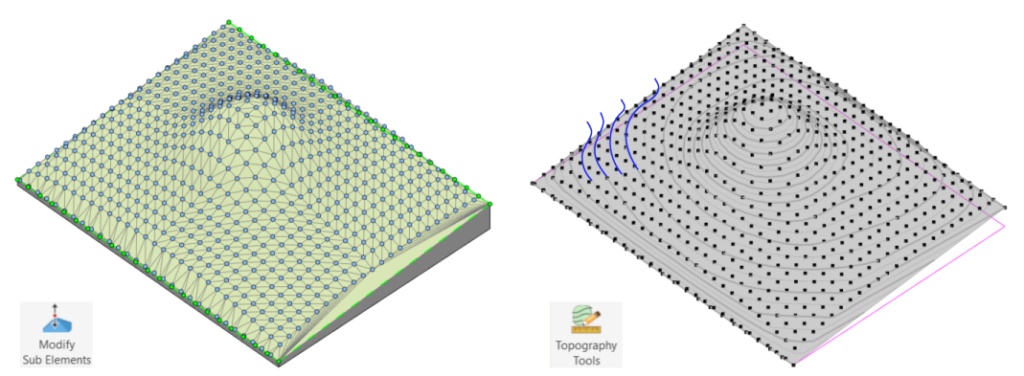
7. Create a reference surface through the Topography Tools
Another cool new feature we’ve added to Environment’s Topography Tools is the ‘Reference Surface’, that, amongst others, allows you to place points outside of the Toposolid’s boundary! Existing only within the scope of the Topography Tools’ editing mode, these points make it super easy to grade and design your site using very few points.
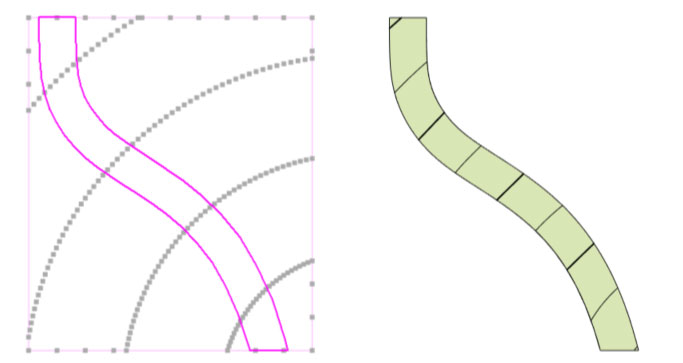
Prior to this feature (and before the emergence of the Toposolid), you had to create a flat Floor and a Toposurface, and then use the ‘Shape by Topography’ feature to drape the floor over the surface. But with our new feature, you can do everything with just one command. No more jumping between different tools and commands! This means you can model faster and more efficiently.
7.1. Match Reference surface to give multiple elements the same slope
The ‘Reference Surface’ feature we just talked about is not only super useful for grading your site, but it also comes in handy when you’re working with multiple elements that need to have the same slope.
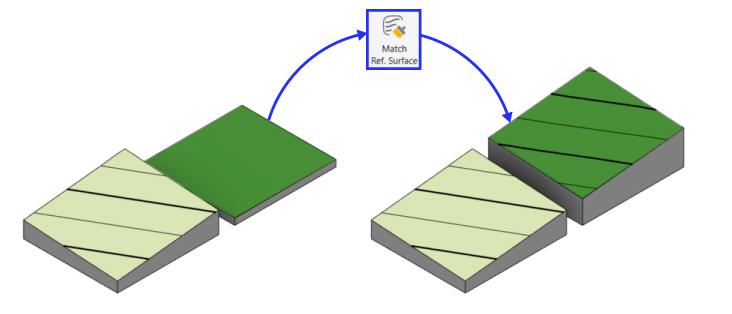
For example, let’s say you’re designing an urban plaza with different types of Toposolids. You want them all to have the same slope, but it can be tricky to match them up perfectly. That’s where the ‘Match Reference Surface’ option comes into play! It allows you to use the same Reference Surface for multiple Toposolid elements, making it a breeze to ensure they all have the same slope, and more importantly – making it so much easier to edit the entire plaza.
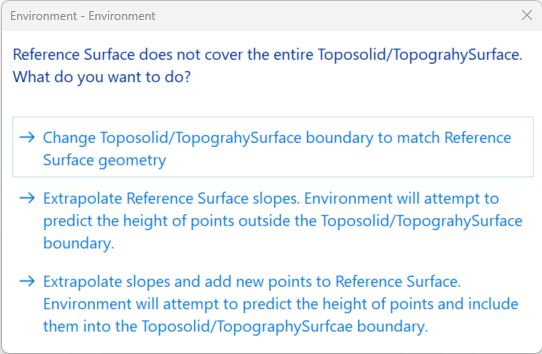
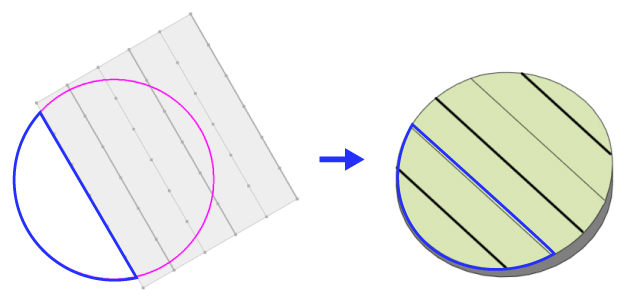
7.2. Extrapolation of the surface shape
Another exciting piece of functionality is the ability to extrapolate surface shapes. If you’ve created a surface that doesn’t cover the entire Toposolid boundary, Environment will extrapolate the surface and make an educated guess about what the shape of the surface should be. This feature is particularly helpful when you need to design a site with irregular shapes and boundaries, and it saves you the trouble of manually adjusting every elevation point to match the surface’s shape.
And even more Environment 11.0 support for Toposolids
Switching between Toposolid and Toposurface
We understand that everyone has their own preferred way of working, and some may not be ready to switch to a new category like Toposolid just yet. That’s why we’ve added a special switcher in the Topography Tools window, allowing you to easily switch between a Toposolid and a Toposurface, for each element. This means you can work in whichever mode you feel most comfortable with.
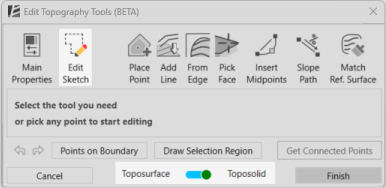
We also want to let you know that Revit 2024 no longer includes the ‘Split Toposurface’ tool. But don’t worry, you can still create a boundary using the ‘Edit Sketch’ option for both Toposolids and Toposurfaces. This means you won’t need to split a surface to make changes to the boundary shape. However, please keep in mind that the boundary feature only works in Revit 2024.
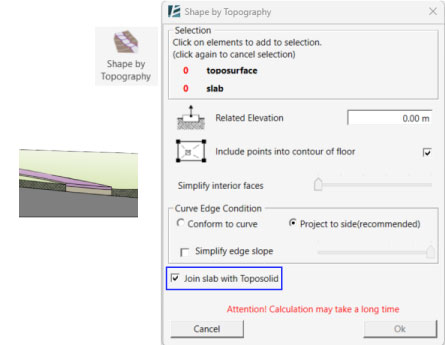
Shape by Topography is here to stay!
Previously used to drape flat floors onto a Toposurface, ‘Shape by Topography’ is now needed for other purposes. In this version, we’ve expanded the tool’s functionality to work with the new Toposolid category, as well. Plus, we’ve added a new ‘Join Geometry’ option to seamlessly integrate slabs with a topography, allowing you to create roads and paths that follow the surface and cut into it (something that is currently not possible with Subdivisions).
Although the new Environment release holds many other new features and improvements, this is it for this post. We hope you’ll enjoy Environment for Revit® V11.0’s extended functionality and continue to use it to design great landscapes. Please keep following us on social media and on our YouTube channel to get all the latest updates. We’re planning many more surprises for you this year :).