Tagging Building Pads in Revit® – A Custom Dynamo Script Wrapped as a Gift
UPDATE: We added the option to change the location of the text using a dedicated parameter in the Dynamo player.
Our focus in this series of posts is, through practical solutions to real-world problems, 4 to help landscape and site-design professionals get the very most out of adopting a BIM approach in their work. As such, when our latest appearance on Revit Pure Live (RPL) turned up an issue not directly related to Environment, but most definitely relevant to our community of users, followers, and readers, we couldn’t pass up on the opportunity to chip in. As you might expect from our team of Revit-loving experts, we not only found a solution, but also packaged it up so anyone who needs it can easily implement it.
Topographies and Building Pads without Tags – Like BIM without Information
Well, if you had the chance to tune in to the aforementioned RPL live tutorial, there’s a good chance you noticed when we ran into the following, irksome Revit limitation: you can’t tag Topographies or Building Pads in Revit!!! Thankfully, Nehama Shechter-Baraban, our Revit expert who was giving the lecture, presented a workaround where you can tag Property Lines as proxies for tagging the lots themselves (in addition to watching the video, you can get an overview of the session on this post about Revit topographies)
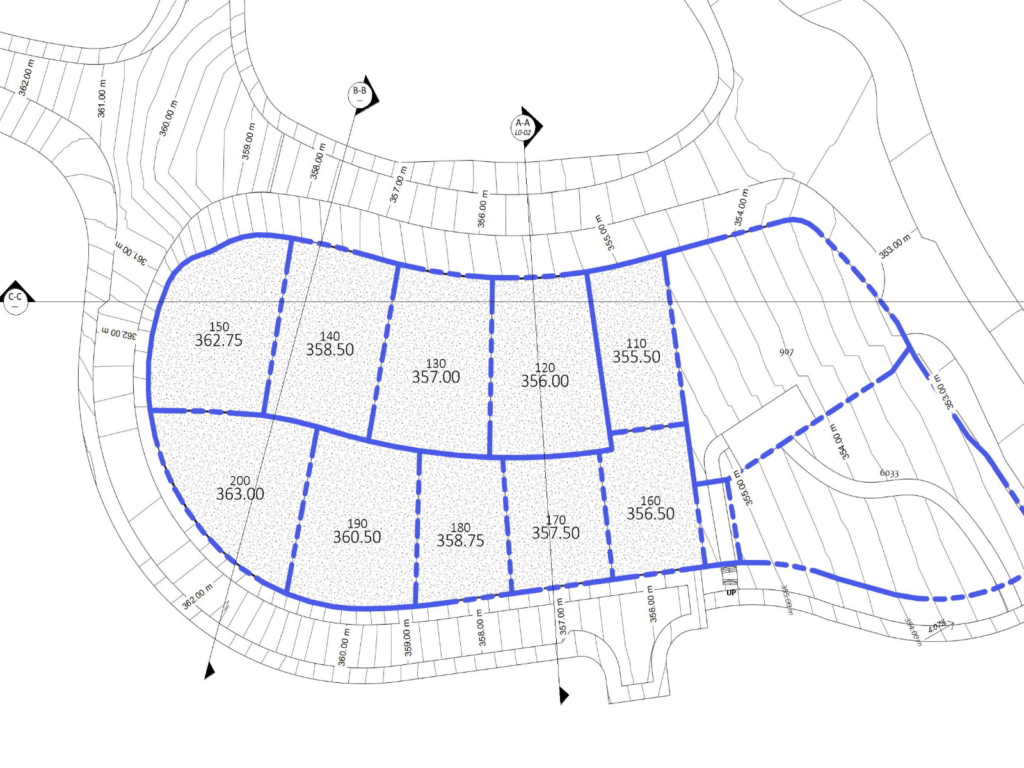
As successful as the presentation was, the tagging issue continued to nag at us. Every Revit user, every professional that employs BIM, is well-acquainted with the importance of tags, as they provide a vital medium by which designers expose the information underlying their models and communicate it onward to other project team members and stakeholders. Take the example of Building Pads, which we used in the RPL session to model the lots of the neighborhood plan that was the basis for the tutorial. The amount of information we can add to each Building Pad is substantial – from lot number and perimeter data, to elevation, area, and more. That’s all well and good, but since we can’t tag Building Pads in Revit, we can’t display this information on our drawings! Instead of transparency, a key tenet of BIM, we have thick fog.
A practical workaround, scripted and packaged just for you (no Dynamo knowledge needed)
For many site designers, to whom Building Pads and, of course, Topographies, are elemental, not being able to tag these components is a big issue. The same goes for many architects when planning areas (e.g., towns, boroughs, etc.).
With the lack of any built-in (to Revit) solution for this (and until we develop an Environment feature that addresses this), we scoured the web for a solution, and found this awesome tutorial by BIMplacehoder, that teaches you how to create your own Dynamo script that you can use to “tag” the Building Pads in your model (well, it’s not a real tag, but it gets the job done)
Seeing, however, that not all of us are sufficiently familiar or proficient with Dynamo to readily take advantage of this solution, and because, at Arch-Intelligence, we’re all about doing more for our clients, users, and followers, we decided to build and package the script such that any of us “ordinary” Revit users could easily use it straight away. So… grab the script here and follow these few simple steps to begin using the script in your own project, to tag the height of a Building Pad, or of any other parameter you wish to display:
- To get started, download the script file “ENV-Building Pad Tag.dyn” from this link and save it on your computer, somewhere you can easily find it later on.
- Open your Revit project that includes the Building Pads you wish to tag.
- Go to the “Manage” tab and select “Dynamo Player” to run the script without opening Dynamo.
- Click on Browse and navigate to the folder where the script is located.
- The script name “ENV-Building Pad Tag.dyn” should now appear in your Dynamo Player window.
- Click on “Edit Inputs” to see the parameters you can set.
- Change the parameters to fit your project. (View name, text style etc.)
- Click “Run Script” and see the results.
(Thank you to Nattalie Mor, our talented partner and BIM virtuoso, also known as MissBIM, for her assistance with the script!) ![]()
While this solution isn’t tagging, it’s a solid solution for quickly displaying information that would otherwise remain “hidden”. We welcome any comments or suggestions for improvements. We also invite you to follow us on LinkedIn and let us know if the script was helpful!
Enjoy!
The Environment for Revit Team